This chapter contains the following topic:
Introduction to Food Service Payroll
Food Service Payroll is an add-on to the standard Passport Business Solutions (PBS) Payroll module that is designed especially for businesses in the food service, restaurant and hospitality industries. These features may be useful in other industries as well.
Food Service Payroll fulfills important industry-specific payroll needs for family style, sit down, and multi-location restaurants. The features include:
| • | Tracks and manages different job roles and rates, with up to 5 default job codes for employees who do different kinds of work at different pay rates during one pay period. |
| • | Provides comprehensive tip management by tracking direct and indirect tips (tips paid by employer) for allocation, including employee sales for tip allocation, FICA tip tax credit reporting, and employer-collected tips for distribution on employee payroll. |
| • | Prints paychecks by department or location and by employee name for easier multi-location payroll distribution. |
| • | Includes an exceptions register that reports deduction and withholding exceptions due to insufficient net pay. |
| • | Provides detailed management reports - including pay distribution by employee, job code, G/L account and more. |
| • | Helps manage ACA requirements throughout the year in addition to Federal Forms 1095-C and 1094-C Year End Reporting. |
| • | Interfaces with many restaurant front-end systems. |
Fully integrated with PBS Payroll and Passport's ACA Management Software, Food Service Payroll makes it easier and more affordable for busy restaurant owners to:
| • | Accurately and efficiently process food service payrolls. |
| • | Manage changing work duties and pay rates. |
| • | Anticipate and control insurance obligations. |
Food Service Payroll Instructions in This Chapter
The information in this chapter assumes that you already have the Food Service Payroll program additions installed on your system. If you do not, contact PBS for help.
After the updated Food Service Payroll programs have been added to your system, several Payroll screens and functions change or have been added to Payroll. These changes and additions are included in the following Payroll selections:
| • | Control information |
| • | Deductions/Earnings |
| • | Payroll Jobs |
| • | Employees |
| • | Time Worked |
| • | Adjustments |
| • | Time Worked Import and other Utilities |
| • | Payroll Food Service Reports |
| • | Quarterly Reporting |
These updated and new features, functions and more are covered in this chapter.
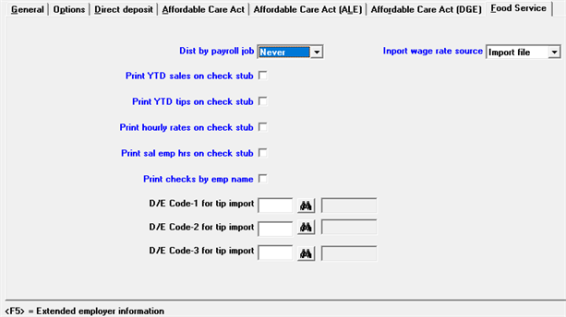
An additional tab is provided with Food Service Payroll. The Options tab has some field settings that directly affect Food Service Payroll
This section only has fields related to Food Service Payroll. The other fields for Control information are covered in the Control Information chapter.
Before entering Control information fields for Deduction/Earning codes used for time worked import, you may want enter these codes using the Deductions/Earnings selection. If they are not entered, you may edit Control information and add them later.
Before entering Employees enter job numbers in Payroll Jobs. If distribute by pay job is set to Always in Control information, you must enter Payroll job 1 in Employees.
The Control information fields affect the Payroll module. However, fields that generally affect Food Service Payroll are located on the Options and Food Service tabs.
Options tab fields
Distribute wages
Must be set to A = Always distribute or S = Selectively distribute in order to use the Payroll Jobs features of Food Service Payroll.
Use meals & tips
Check this box (Yes) in order to use the meals and tips features of Food Service Payroll. May be set as unchecked (No).
Food Service Control Information Tab
Enter Always if you want all regular, overtime, and special pay and hours, and salary pay to be distributed by payroll job and posted to the Payroll Job History file. If this field is set to Always there must be a valid payroll job in Payroll job 1 in Employees.
If the Distribute wages field is set to checked in Employees you will be required to enter a valid payroll job during entry in Time worked.
Enter Selectively if you want to selectively distribute pay by payroll job during entry in Time worked.
Select Never if you do not want to distribute by payroll job during entry in Time worked. This field defaults to Never if Distribute wages on the Options tab is set to Never.
|
Distribute by payroll job |
A= Always |
S = Selectively |
N= Never |
|
|---|---|---|---|---|
|
Distribute wages = A |
Job |
Job or G/L |
G/L |
|
|
Distribute wages = S |
|
|
|
|
|
|
Emp Distrib wages = Y |
Job |
Job or G/L |
G/L |
|
|
Emp Distrib wages = N |
None |
None |
None |
|
Distribute wages = N |
N/A |
N/A |
None |
|
Used only for Payroll Import. Select Import file (I) to use the wage rate in the import file, Job code file (J) to use the wage rate in the Payroll Jobs for the payroll job number in the import file, and Employee file (E) to use the wage rate in Employees. You may leave this blank if you do not import payroll data.
Check this box (Yes) is you want to have YTD employee sales printed on the payroll check stub.
Check this box (Yes) if you want to have YTD reported tips printed on the payroll check stub.
Print hourly rates on check stub
Check this box (Yes) if you wish the program to print hourly rates on the check stub.
Print sal emp hrs on check stub
Check this box (Yes) if you wish the program to print regular, overtime, special, and holiday hours on the check stub. Sick (or PTO) and vacation hours always print, unless excluded elsewhere (Incl. sick hrs on check and Incl. vac hrs on check ).
Check this box (Yes) if you wish the program to print payroll registers and checks by employee name within department. Employee names should be entered last name first.
D/E Code-2 for time import
D/E Code-3 for time import
If using Payroll Import on the Time worked menu, entry in these fields is required. They must be codes for direct tips, indirect tips, and meals, in that order.
Tips earnings codes may be designated as Direct Tips or Indirect Tips.
In addition, Tips codes maybe designated as paid by employer. Tips Paid remain classified as Tips throughout the system, but are added to the net pay on payroll checks.
This section only has fields related to Food Service Payroll. The other fields for Deductions/Earnings tips are covered in the Tips Code section of the Deductions and Earnings chapter.
Enter T for Tips.
There is no screen label for this field. At the next prompt on the same line enter D for Direct Tips or I for Indirect Tips.
There is no screen label for this field. Also on the same line at the next prompt check the box (Yes) or uncheck it (No) for Paid (Paid indicates tips paid). Tips paid are reported tips that are paid on a payroll check. Answer N for reported tips received by the employee and reported to the employer.
The Payroll Jobs contain the job numbers that you set up for the distribution of wages.
If you do not wish to use Payroll Jobs, do not enter any. If Payroll Jobs is empty, the software will handle distributions to G/L accounts in the usual manner. Each job number has hourly rates and a wage account. This feature provides automatic default pay rates and G/L distribution accounts. How Payroll Jobs are used depends upon certain control settings. You can define as many jobs as you like. Each job number has a description, regular, overtime, and special pay rates, and a G/L distribution account number.
Select
Payroll jobs from the Master information menu. The following graphical mode screen displays:

Enter the following fields:
Enter a number for this Payroll Job. It must be numeric. Press data look-up key to view window of payroll jobs.
Options
|
<F1> |
For next payroll job |
| <SF1> | For the previous payroll job |
|
Format |
5 digits |
Enter a description for this Payroll Job.
|
Format |
30 characters |
Enter the rate of pay for regular hours worked on this Payroll Job.
|
Format |
99999.999 |
Enter the rate of pay for overtime hours worked on this Payroll Job of use the option:
Options
|
<F1> |
To use the overtime rate which is calculated by using the Regular rate, entered above. times the Overtime pay factor in Control information. |
|
Format |
99999.999 |
Enter the rate of pay for special hours worked on this Payroll Job or use the option:
Options
|
<F1> |
To use the special rate which is calculated by using the Regular rate, entered above, times the Special pay factor in Control information. |
|
Format |
5 digits |
Enter the general ledger account number for distribution of wages on this Payroll Job. Press data look-up key to view window of valid accounts.
Options
|
<F5> |
Varies by sub account or varies by cost center, if applicable. |
<F5> Varies by sub account or varies by cost center, if applicable.
This section explains how some employee fields affect how parts of the Food Service Payroll system function.
There are fields on the Wages/Rates tab several fields control Food Service functions. There is a Food Service for entering Jobs information and where sales and tip amounts are accumulated.
Also, several deduction/earning codes must be entered in Employees in order for certain functions to work properly.
Wage account #
If using cost centers, the Cost Center 1 segment of this account number is used when an account number elsewhere, such as in Payroll jobs, Deductions/Earnings, or Tax tables has been entered as cost cntrs vary w/employee. If not using cost centers, but using sub-accounts, the Sub Account segment is used when sub accts center vary w/employee. This wage account is also used for undistributed pay amounts.
Regular rate
The rate entered here is used by the program for regular hours when a valid payroll job is not found. It is also used during Time worked (Payroll import) if Import wage rate source in Control information is set to Employees (E).
Overtime rate
The rate entered here is used by the program for overtime hours when a valid payroll job is not found. It is also used during Time worked (Payroll import) if Import wage rate source in Control information is set to Employees (E).
Special rate 1
The rate entered here is used by the program for special hours when a valid payroll job is not found. It is also used during Time worked (Import) if Import wage rate source in Control information is set to Employees (E).
Distribute wages
In order to distribute wages by payroll job you must check this box. However, you may optionally skip payroll jobs and distribute only by G/L account during Time worked (Enter) if Dist by payroll job is set to Selectively in Control information. As in the standard software, the setting of this field becomes irrelevant if Distribute wages in Control information is set to Always or Never.
Select the Food Service tab to enter, view, or change payroll jobs, sales, and reported tips for this employee. This tab is only accessible if the Control information fields of either Use meals & tips is checked or Dist by payroll job Is either Always or Selectively.
Aux info in character mode
While the jobs information is entered on the Food Service tab in graphical mode, using character mode, press <SF5 to open a window to access Aux info window.
Jobs entry
Up to five job codes can be entered which optionally default Payroll Jobs during the entry of distributions in Time worked (Enter). After entering a job code, the Payroll job description and rates display from Payroll Jobs and may not be changed here.
If Dist by payroll job is set to Always in Control information, you will be required to enter a valid payroll job number in the first Jobs field.
Sales YTD, Sales next year, Reported tips YTD, and Reported tips next year
Sales YTD, Sales next year, Reported tips YTD and Reported tips next year are updated by the software during posting.
These fields should only be entered manually if Food Servcie Payroll is a new system.
Enter the regular rate.
Deductions/Earnings tab
Food Service Payroll allows entry of a meals type deduction code here. This is used to identify employees for whom an automatic calculation of meals is used during Payroll Import. It is recommended that you use an amount of zero and a frequency of daily, or some other frequency you do not normally use for other regular deductions. Field 47. Default meals rate in Control information is used to calculate the meals amount during import. You may also enter a meals code if you wish to record a fixed amount on a regular basis for the employee.
Tip-wage deduction/earning code
If you pay a tip-wage, enter the deduction/earning code, entered in Tip-wage ded/earn code in Control information, with an amount of zero in order to identify employees who are eligible. The payroll calculation program automatically calculates the tip-wage.
If Distribute by payroll job is set as Never in Control information, the distribution screens will appear the same as standard Payroll, depending on whether Job Cost is used, the settings of Distribute wages in Control Information and Distribute wages in Employees. If Distribute by payroll job is Always or Selectively Payroll Jobs are used and the distribution screen changes. If Payroll Jobs are used, enter the distribution information as follows:
For a new distribution
If you are distributing this employee's wages to a Payroll Job, enter a valid Payroll Job number here. The description of the job displays automatically. Enter the Payroll Job number or use one of the options:
Options
|
<F1> |
To scan through the Payroll Jobs for this employee. |
|
<F2> |
To scan through the Payroll Jobs in Payroll Jobs. |
|
<SF2> |
To scan through the Payroll Jobs in the Payroll Job file in reverse order. |
|
<F7> |
To automatically use all defaults. There must be a valid Payroll Job in Payroll job I in Employees to use this feature and this is the only default Payroll Job. If distributing more than one type of pay, e.g. regular and overtime, you may use this feature repeatedly. |
| <Enter> | To skip this field and enter a non-Payroll Job distribution, i.e. distribute by G/L account only. This is allowed only if Distribute by payroll job is set to Selectively in Control information. |
|
Format |
5 digits |
For an existing distribution
With character mode, you can access a distribution by entering its key fields: Pay job #, Distribution type, and G/L account #. You may also one of these options:
Options
|
<F1> |
To scan through the distributions on file. |
|
<SF1> |
To scan through the distributions on file in reverse order. |
If you enter the key fields for a distribution, the program searches for one that matches what you entered. If one matches, you can change any field except the key fields.
This field only displays if you selected SF1 from the Pay job # field.
This field provides a drop down list of the available jobs for this employee.
Enter the type of distribution, as displayed across the bottom of the screen.
Hourly employees
|
R |
Regular |
|
O |
Overtime |
|
X |
Special |
Salaried employees
|
S |
Salary |
|
O |
Overtime |
|
X |
Special |
|
Format |
1 character |
Enter the number of the G/L account to which the number of hours or percent of salary is to be distributed. Enter the account number, or use one of these options:
Option:
|
<F1> |
To use the account for the Payroll Job, if the distribution is for a Payroll Job. If Cost Center or Sub Account vary w/employee for the Payroll Job, the Cost Center or Sub Account from the employee's wage account will be used. |
| To use the wage account for this employee entered in Employees, if the distribution is not for a Payroll Job. |
If the employee is hourly, this is the number of hours to be distributed to the account and Payroll Job entered above.
If the employee is salaried and Pay salary? is checked on the first screen of Time worked, enter the percent of the salary distributed to the account and job you entered. Overtime and special hours are distributed on an hourly basis, even for a salaried employee.
An employee's pay for holiday hours, sick hours, and vacation hours is always computed using the regular rate. These pay amounts are automatically distributed to accounts specified in the federal tax code record, not in Time worked. Amounts for Earnings Codes are also automatically distributed to the accounts specified in Deductions/Earnings.
If you wish to delete a distribution, change the hours or set to zero, Enter the hours or percent or use the option:
Options
|
<F2> |
For the hours/percent remaining for the distribution type. |
|
Format |
999.99 |
Rate
If you entered hours in the previous field, enter the rate of pay that is multiplied by those hours to determine the dollar amount of this distribution. Enter the rate of pay or use the option:
Options
|
<F2> |
When entering a new distribution, the hourly rate for the Payroll Job. |
|
|
When changing an existing distribution, the employee's hourly rate as entered in Employees. |
|
Format |
999.99 |
Reference
You may enter any reference or comment here.
|
Format |
25 characters |
When you are done with this distribution, it displays and you are prompted for the next distribution. You can enter more than one distribution for the same pay type and account number, and you may enter different distributions for special pay at varying rates.
If at least one Payroll job exists, the distribution screen is different for Food Service Payroll than without it.
If there are no entered Payroll Jobs, the distribution screens will appear as in standard Payroll, depending on whether Job Cost is used. For the standard entry see Manual Distributions to General Ledger.
If Payroll Jobs are used, enter the distribution information as follows:
Pay job #
For a new distribution. If you are distributing this employee's wages to a Payroll Job, enter the Payroll Job number here. The Payroll Job must be on file. The description of the job displays automatically. Enter the Payroll Job number or use one of the options:
Options
|
<F1> |
To scan through the Payroll Jobs for this employee. |
|
<F2> |
To scan through the Payroll Jobs in the Payroll Job file. |
|
<SF2> |
To scan through the Payroll Jobs in the Payroll Job file in reverse order. |
|
<Enter> |
To enter a non-Payroll Job distribution, i.e. distribute by G/L account only. |
|
Format |
5 digits |
For an existing distribution. You can access a distribution by entering its key fields: Payroll job #, Distribution type, and G/L acct #. You may also one of these options:
Options:
|
<F1> |
To scan through the distributions on file. |
|
<SF1> |
To scan through the distributions on file in reverse order. |
If you enter the key fields for a distribution, the program searches for one that matches what you entered. If one matches, you can change any field except the key fields.
Distrib type
Enter the type of distribution, as displayed across the bottom of the screen.
Hourly employees
|
R |
Regular |
|
O |
Overtime |
|
X |
Special |
Salaried employees
|
S |
Salary |
|
O |
Overtime |
|
X |
Special |
|
Format |
1 character |
G/L acct #
Enter the number of the G/L account to which the number of hours or percent of salary is to be distributed. Enter the account number, or use one of these options:
Option:
|
<F1> |
To use the account for the Payroll Job, if the distribution is for a Payroll Job. If Cost Center or Sub Account vary w/employee for the Payroll Job, the Cost Center or Sub Account from the employee's wage account will be used. |
|
|
To use the wage account for this employee in the Employees, if the distribution is not for a Payroll Job. |
|
Format |
999.99 |
Hours or pct
If the employee is hourly, this is the number of hours to be distributed to the account and Payroll Job entered above.
If the employee is salaried and Pay salary? is Y on the main screen of Time worked (Enter), enter the percent of the salary distributed to the account and job you entered. Overtime and special hours are distributed on an hourly basis, even for a salaried employee.
An employee's pay for holiday hours, sick hours, and vacation hours is always computed using the regular rate. These pay amounts are automatically distributed to accounts specified in the federal tax code record, not during Time worked (enter). Amounts for Earnings Codes are also automatically distributed to the accounts specified in Deductions/Earnings.
If you wish to delete a distribution, change the hours or pet to zero, Enter the hours or percent or use the option:
Options
|
<F1> |
For the hours/percent remaining for the distribution type. |
|
Format |
999.99 |
Rate
If you entered hours in the previous field, enter the rate of pay that is multiplied by those hours to determine the dollar amount of this distribution. Enter the rate of pay or use the option:
Options
|
<F1> |
When entering a new distribution, the hourly rate for the Payroll Job. |
|
|
When changing an existing distribution, the employee's hourly rate as entered in Employees. |
|
Format |
99999.999 |
Amount
This is the amount of pay for this distribution line. For an hourly employee, enter the amount or use the option:
Option:
|
<F1> |
To use an amount equal to the number of hours times the rate for this distribution. |
|
Format |
99,999,999.99- |
When you are done with this distribution, it displays at the bottom of the screen and you are prompted for the next distribution.
This selection imports records from a pre-defined ASCII text file into Payroll Time Worked.
Select
Payroll import from the Time worked menu.
The following screen displays:
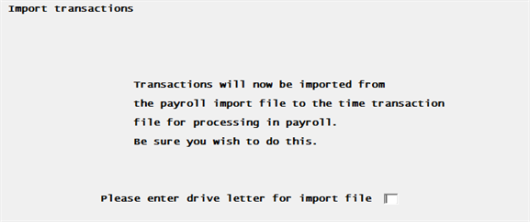
The import files must be in a specific format, have a specific filename, and exist in either the Passport Business Solutions top-level directory or the current directory of a mapped drive. You may either enter a drive letter location ("device") for the file or press ENTER to default to the top-level directory. This import is designed to work with FoodService Payroll.
Import File Names
Payroll Import:
PRINTFxx.FLT
LMlNTFxx.FLT
where xx is Company-ID.
The program first attempts to open PRINTFxx.FLT. If it is unable to open that file it will then attempt to open LMlNTFxx.FLT. If both files are present, only PRINTFxx.FLT will be processed.
Numeric Fields
All numeric fields must be right justified with leading zeros. There should be no decimal characters, since the decimal place is implicitly assumed. Signed numeric fields must have a separate trailing sign (+ or -).
Example: If signed numeric with 2 decimals and length of 9
-355.68 is recorded as 00035568-
1.15 is recorded as 00000115+
Dates
Note that the date fields in the import file are in 6-digit format. This is not a fine since the import program converts these dates into the 8-digit format required for PBS Payroll. The full year is determined based on the Year 2000 cut-off in Company Information.
This layout supports time transactions from Restaurant POS. Each line imports as a separate Time worked record.
This is a fixed length format for the LMlNTFxx.FLT file. The xx in the file name indicates the PBS company ID. The layout is 193 columns long.
Columns Explanation
Beg pos means beginning column position in the file. End pos means ending column position. Length is the total number of columns it utilizes in the file.
In the Data format column:
| • | A field that starts with a 9 is a number only. All numbers are filled in on the left with zeros if the there are not enough digits for the entire field. |
| • | The decimal place is implied with a V. For example, a V99 has 2 decimal places and V999 has 3 decimal places. |
| • | An S represents a sign which can be either plus or minus. |
| • | YYMMDD represents YY = Year, MM = Month and DD = Day. |
| • | An X means that the field is alphabetical, not numeric only. |
|
Record Structure: Payroll Time Worked Transactions |
|||||
|---|---|---|---|---|---|
|
Beg pos |
End pos |
Length |
Field description |
Data format |
Sample data |
|
1 |
2 |
3 |
Record type |
X[2] |
LM=Labor Manager |
|
3 |
12 |
10 |
Employee number |
9[10] |
0123456789 |
|
13 |
19 |
6 |
Pay period start date |
YYMMDD |
941224 |
|
19 |
24 |
6 |
Pay period end date |
YYMMDD |
941231 |
|
25 |
29 |
5 |
Job class |
9[5[ |
12345 |
|
30 |
30 |
1 |
Pay salary flag |
X[1] |
Y or N |
|
31 |
37 |
7 |
Regular hours |
9[4]V99S |
123412+ |
|
38 |
44 |
7 |
Regular pay rate |
9[3]V999S |
12323+ |
|
45 |
51 |
7 |
Overtime hours |
9[4]v99S |
123412+ |
|
52 |
58 |
7 |
Overtime pay rate |
9[3]V999S |
123123+ |
|
59 |
65 |
7 |
Special hours |
9[4]V99S |
123412+ |
|
66 |
72 |
7 |
Special pay rate |
9[3]V999S |
123123+ |
|
73 |
79 |
7 |
Holiday hours |
9[4]V99S |
123412+ |
|
80 |
86 |
7 |
Sick hours |
9[4]V99S |
123412+ |
|
87 |
93 |
7 |
Vacation hours |
9[4]V99S |
123412+ |
|
94 |
94 |
1 |
Advance vacation weeks |
9[1] |
0 to 4 |
|
95 |
101 |
7 |
Vacation hours accrued |
9[3]V999S |
123123+ |
|
102 |
108 |
7 |
Sick hours accrued |
9[3]V999S |
123123+ |
|
109 |
113 |
5 |
Weeks worked |
9[2]V99S |
1212+ |
|
114 |
119 |
6 |
Work units |
9[3]V99S |
12312+ |
|
120 |
128 |
9 |
Direct tips |
9[6]V99S |
12345612+ |
|
129 |
137 |
9 |
Sales |
9[6]V99S |
12345612+ |
|
138 |
146 |
9 |
Indirect tips |
9[6]V99S |
12345612+ |
|
147 |
155 |
9 |
Meals |
9[6]V99S |
12345612+ |
|
156 |
158 |
3 |
Temp D/E 1 code |
X[3] |
Valid PR D/E Code |
|
159 |
167 |
9 |
Temp D/E 1 amount |
9[6]V99S |
12345612+ |
|
168 |
170 |
3 |
Temp D/E 2 code |
X[3] |
Valid PR D/E Code |
|
171 |
179 |
9 |
Temp D/E 2 amount |
9[6]V99S |
12345612+ |
|
180 |
182 |
3 |
Temp D/E 3 code |
X[3] |
Valid PR D/E Code |
|
183 |
191 |
9 |
Temp D/E 3 amount |
9[6]V99S |
12345612+ |
|
192 |
192 |
1 |
Carriage return * |
9 |
D |
|
193 |
193 |
1 |
Line feed * |
9 |
A |
* This is an end of line indicator. The Carriage return and Line feed will not be visible in some applications like Notepad. For some applications it may display as <CR><LF>.
This utility allows you to change the Food Service fields in QTD History (QTDHIS) and Payroll History (KHISFL).
On the PR Utility menu select Maintain enhanced fields. The following screen displays:

You may scroll through the records using <F1> (forward order) and <SF1> (reverse order), making changes as appropriate.
Use the PgDn key to display the next screen.
Payroll jobs contains Payroll Job codes and descriptions, along with their G/L accounts and hourly rates.
Payroll job history contains a history of payroll distributions by Payroll Job for each check posted. There is one record for each distribution in a time transaction. It is used to produce the Job Distribution Report and Job Distribution Report by Employee.
Deduction Exceptions Temp file. This temporary file contains payroll deductions exceptions and is created during payroll calculation.
To access the Payroll utilities, type prutil from the top-level PBS folder. to log in you must be a PBS administrative user.
Use the PgDn key to display the next screen.
Payroll jobs (PAYJOBxx)
This contains Payroll Job codes and descriptions, along with their G/L accounts and hourly rates.
Payroll job history (PRJIIISxx)
This Tile contains a history of payroll distributions by Payroll Job for each check posted. There is one record for each distribution in a time transaction. It is used to produce the Job Distribution Report and Job Distribution Report by Employee.
The following reports are provided for Food Service.
Select
401(k) information from the Reports, Foodservice menu.
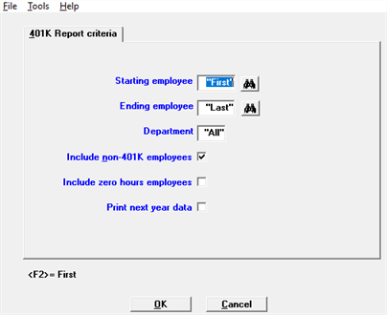
Enter the following fields:
Enter the employee number of the first employee you wish to print on this report or use the option.
|
<F2> |
For "First" employee |
|
Format |
999999 |
|
Example |
Press <F2> for the "First" employee |
Enter the number of the last employee you wish to print on this report or use one of the options.
|
<F2> |
For "Last" employee |
|
<Enter> |
Character mode only. For the same employee number as the starting employee |
|
Format |
999999 |
|
Example |
Press <F2> for the "Last" employee |
Options
Enter the department to include in the report, or use the option:
|
<F5> |
For "All' departments |
|
Format |
9999 |
|
Example |
Press <F5> |
Check this box to include employees who did not participate with 401(k) contributions.
|
Format |
Graphical: Checked is yes and unchecked is no. The default is checked. Character: One letter, either Y or N. The default is Y. |
Check this box to include employees who have no hours worked.
|
Format |
Graphical: Checked is yes and unchecked is no. The default is unchecked Character: One letter, either Y or N. The default is N. |
If you have posted time worked data in the first quarter of the next year, you may check this box to include those records with this report. If you do not have any posted employee data in the next year, you should not check this box.
|
Format |
Graphical: Checked is yes and unchecked is no. The default is unchecked Character: One letter, either Y or N. The default is N. |
Select OK to print the report or Cancel to return to the menu without printing.
Select
Employees by selected date from the Reports, Foodservice menu.
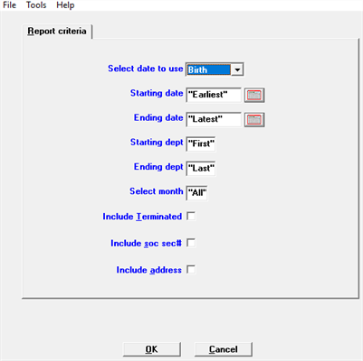
Enter the following fields:
You may print the report by these date ranges:
| Character | Graphical | Description |
|---|---|---|
| B | Birth | Print by employee birth date |
| H | Hire | Print by employee hire date |
| L | Last raise | Print by employee last raise date |
| R | Review | Print by employee last review date |
| T | Terminated | Print by employee terminated date |
|
Format |
Drop down list |
Enter the starting check date for the range of checks you wish to include in this report or use the option.
|
<F2> |
For "Earliest" |
|
Format |
MMDDYY |
|
Example |
Press <F2> for the "Earliest" check date you wish to print |
Enter the ending check date for the range of checks you wish to include in this report or use one of the options.
|
<F2> |
For "Latest" |
|
<Enter> |
For the same date as the starting date |
|
Format |
MMDDYY |
|
Example |
Press <F2> for the "Latest" check date you wish to print |
Ending depart
Options
Enter the range of department numbers to include in the QTD / YTD Time Worked Report, or use the option:
|
<F2> |
"First" starting department or "Last" ending department number |
|
Format |
9999 at each field |
|
Example |
Press <F2> |
Options
Enter a month 1 to 12 to include in the report, or use the option:
|
<F5> |
For "All' months |
|
Format |
99 |
|
Example |
Press <F5> |
Check this box to include terminated employees on the report.
|
Format |
Graphical: Checked is yes and unchecked is no. The default is unchecked. Character: One letter, either Y or N. The default is N. |
Check this box to print the employee's social security number on the report.
|
Format |
Graphical: Checked is yes and unchecked is no. The default is unchecked. Character: One letter, either Y or N. The default is N. |
Check this box to print the employee's address on the report.
|
Format |
Graphical: Checked is yes and unchecked is no. The default is unchecked. Character: One letter, either Y or N. The default is N. |
Select OK to print the report or Cancel to return to the menu without printing.
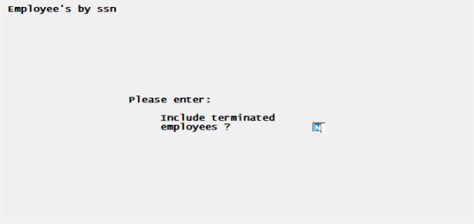
Select
Employees by soc sec# from the Reports, Foodservice menu.
Enter the following fields:
Enter Y to include terminated employees on the report. Otherwise select Enter for the default of N.
|
Format |
One letter, either Y or N. The default is N. |
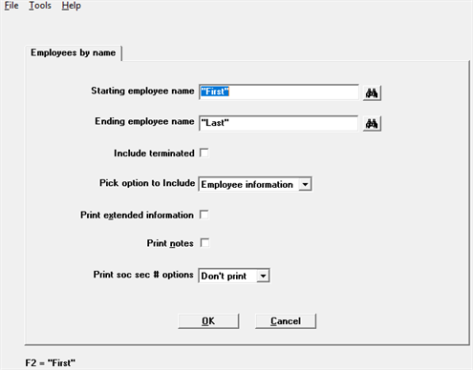
Select
Employees by name (enhanced) from the Reports, Foodservice menu.
Enter the following information:
Ending employee name
Enter the range of employee names to print on the list. Follow the screen instructions.
The names you enter do not have to be actual employees’ names, so long as they define the desired range.
|
Format |
25 characters at each field |
|
Example |
Press <F2> at each field for a range of "First" through "Last" |
Check this box to include terminated employees on the report.
|
Format |
Graphical: Checked is yes and unchecked is no. The default is unchecked. Character: One letter, either Y or N. The default is N. |
You may choose the following to be included on the report:
| Character | Graphical | Description |
|---|---|---|
| P | Phone number | Employee phone number |
| E | Employee information | Employee information |
| A | Aux information | Employee auxiliary information |
| R | Hourly rates | Hourly pay rates |
|
Format |
Drop down list |
Check this box to print extended information on the report.
|
Format |
Graphical: Checked is yes and unchecked is no. The default is unchecked. Character: One letter, either Y or N. The default is N. |
Check this box to print employee notes on the report.
|
Format |
Graphical: Checked is yes and unchecked is no. The default is unchecked. Character: One letter, either Y or N. The default is N. |
You may choose one of the following social security number options to be included on the report:
| Character | Graphical | Description |
|---|---|---|
| N | Don't print | Do not print the social security number |
| M | Mask | Mask the social security number |
| Y | Print the full social security number |
|
Format |
Drop down list |
Select OK to print the report or Cancel to return to the menu without printing.
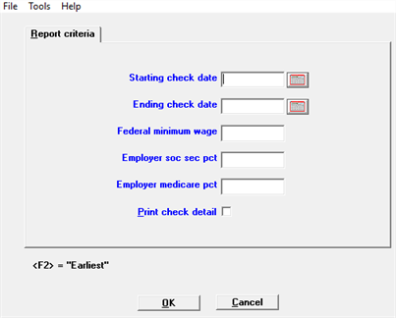
Select
FICA income tax credit from the Reports, Foodservice menu.
Enter the following fields:
Enter the starting check date for the range of checks you wish to include in this report or use the option.
|
<F2> |
For Earliest |
|
Format |
MMDDYY |
|
Example |
Press <F2> for the Earliest check date you wish to print |
Enter the ending check date for the range of checks you wish to include in this report or use one of the options.
|
<F2> |
For Latest |
|
<Enter> |
For the same date as the starting date |
|
Format |
MMDDYY |
|
Example |
Press <F2> for the Latest check date you wish to print |
Federal minimum wage
Enter the amount of the federal minimum wage.
Employer soc sec pct
Employer medicare pct
Check this box to print check details on the report.
|
Format |
Graphical: Checked is yes and unchecked is no. The default is unchecked. Character: One letter, either Y or N. The default is N. |
Select OK to print the report or Cancel to return to the menu without printing.
Select
Job distribution by employee from the Reports, Foodservice menu.
Select
Job distribution by job from the Reports, Foodservice menu.
Enter the starting check date for the range of checks you wish to include in this report or use the option.
|
<F2> |
For Earliest |
|
Format |
MMDDYY |
|
Example |
Press <F2> for the Earliest date you wish to print |
Enter the ending check date for the range of checks you wish to include in this report or use one of the options.
|
<F2> |
For Latest |
|
<Enter> |
For the same date as the starting date |
|
Format |
MMDDYY |
|
Example |
Press <F2> for the Latest date you wish to print |
Select
Job distribution by pft ctr from the Reports, Foodservice menu.
Enter the starting date you wish to include in this report or use the option.
|
<F2> |
For "Earliest" |
|
Format |
MMDDYY |
|
Example |
Press <F2> for the "Earliest" date you wish to print |
Enter the ending date you wish to include in this report or use the option:
|
<F2> |
For "Latest" |
|
Format |
MMDDYY |
|
Example |
Press <F2> for the "Latest" date you wish to print |
Enter the profit center or use the option.
Enter the starting job for the range you wish to include in this report or use the option.
|
<F2> |
For "First" |
|
Format |
MMDDYY |
|
Example |
Press <F2> for the "First" job you wish to print |
Enter the ending job you wish to include in this report or use the option:
|
<F2> |
For "Last" |
|
Format |
MMDDYY |
|
Example |
Press <F2> for the "Last" job you wish to print |
You may choose the following to be included on the report:
| Character | Graphical | Description |
|---|---|---|
| H | Hours | Prints employee regular, overtime and special hours. |
| P | Pay | Prints employee's regular pay, overtime pay, special pay and salary pay. |
|
Format |
Drop down list |
Check this box to print the report by department.
|
Format |
Graphical: Checked is yes and unchecked is no. The default is checked. Character: One letter, either Y or N. The default is Y. |
Check this box to print the report by employee.
|
Format |
Graphical: Checked is yes and unchecked is no. The default is checked. Character: One letter, either Y or N. The default is Y. |
Check this box to print the report by main account.
|
Format |
Graphical: Checked is yes and unchecked is no. The default is unchecked. Character: One letter, either Y or N. The default is N. |
Select OK to print the report or Cancel to return to the menu without printing.
Select
Payroll jobs list from the Reports, Foodservice menu.
No selection criteria is required for running this report. All jobs are printed. Select a printer or display the list on screen.
Select
Tip allocation report from the Reports, Foodservice menu.
Enter the starting date you wish to include in this report or use the option.
|
<F2> |
For "Earliest" |
|
Format |
MMDDYY |
|
Example |
Press <F2> for the "Earliest" date you wish to print |
Enter the ending date you wish to include in this report or use the option:
|
<F2> |
For "Latest" |
|
Format |
MMDDYY |
|
Example |
Press <F2> for the "Latest" date you wish to print |
You may choose the report in either order:
| Character | Graphical | Description |
|---|---|---|
| A | Name | Prints the report in employee name order. |
| N | Number | Prints the report in employee number order. |
Enter the profit center or use the option.
Select OK to print the report or Cancel to return to the menu without printing.
Header Fields
Total FWT Gross + Total Meals. This is the grand total of FWT Gross wages plus meals for all employees printed on your report.
Employee Fields
FWT Gross + Meals. This is FWT gross amount plus meals for all payroll checks posted for each employee for the quarter specified in your report.
Totals Fields
Total FWT Gross + Total Meals. This is the grand total of FWT Gross wages plus meals for all employees printed on your report.